Anyway, this Friday, I’m going to be showing you what I know about server racks.
I started out on a network that had a bunch of tower machines on industrial shelves; the sort you pick up at Harbor Freight or Big Lots. When we moved to racks and rackmount servers, it was like a whole new world.
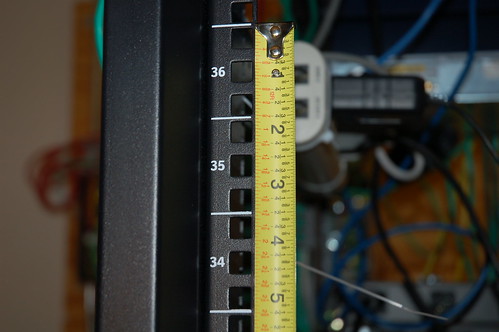
The first difference is form-factor. Tower servers are usually rated by the “tower” descriptive. Full tower, half tower, mid-tower. Rack Servers are sized according to ‘U’s, short for “Rack Unit”. It’s equivalent to 1 3/4 inches, so a 2U server is 3.5” tall. The standard width for rackmount servers is 19” across. Server racks vary in depth, between 23 and 36”, with deeper being more common.
Instead of shelves for each server, rack hardware holds the server in place, usually suspended by the sides of the machine. They allow the server to slide in and out, sometimes permitting the removal of the server’s cover to access internal components. Different manufacturers have different locking mechanisms to keep the servers in place, but all rack kits I’ve seen come with instructions.
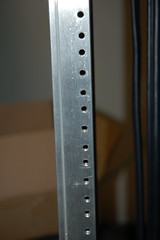
 To anchor the rack hardware (also known as rails) to the rack itself, a variety of methods have been implemented. There are two main types of rack. Round hole racks, seen at the left, require a special type of rack hardware. Much more common is square hole racks, which require the use of rack nuts. The rack nuts act as screw anchors to keep the hardware in place. Some server manufacturers have created specific rack hardware that fits most square hole racks, and don’t require the use of rack nuts. Dell’s “rapidrail” system is one with which I’m very familiar. Typically you get the option of which rail system you want when you purchase the system.
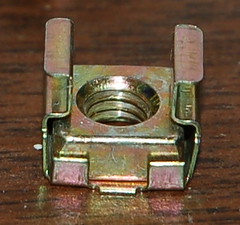
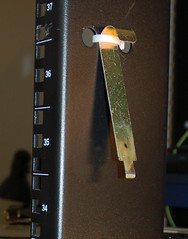
Installing the rack nuts is made easier with a specialized tool. I call it the “rack tool”, but I’m sure there’s another name. The rack nut is place with the inside edge clip in place, through the hole. The tool is inserted through the hole, grabs the outside clip, and then you pull the hook towards you. This pulls the outside clip to the front of the hole, securing the nut in place.
 A typical server will require eight nuts, usually at the top and bottom of each rack unit, on the right and left sides, front and back. Each rack unit consists of three square holes, and a rack nut is put in the top and bottom of both the right and the left sides. Several pieces of networking equipment have space for four screws, but I’ve found that they stay in place fine with two. I can’t really recommend it for other people, but if you’re low on rack nuts, it’s better than letting the switches just sit there (and it almost always seems like you have fewer rack nuts than you need once your rack starts growing). If you only use two screws to hold in your n
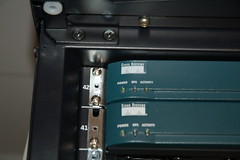 etworking equipment, make sure it’s the bottom two. The center of gravity of a rackmount switch is always behind the screws, so if the top screws hold it up, the bottom has a tendency to swing out, and that’s not good for your rack or your hardware.
While I’m on the subject of swtches, let me give you this piece of advice. Mount your switches in the rear of the rack. It seems obvious, but you have no idea how many people mount them on the front in the beginning because “it looks cooler” and then regrets it when they continually have to run cable through the rack to the front.
Once your rack starts to fill out, heat will become an issue. When you align your rack for your air conditioner, another bit of common sense that’s frequently ignored. Air goes into the servers through the front, and hot air leaves through the back. This means that when you cool your rack, you should point the AC towards the front of your rack, not the back.
Air comes in here... And leaves back here


It’s probably not a stranger to anyone who’s used a computer, but the cables seem to have a mind of their own, and nowhere is it more apparent than a reasonably full server rack. Many higher-end solutions provide built-in cable management features, such as in-cabinet runs for power cables or network cables, swing arms for cabling runs, and various places to put tie-downs.
There is no end-all-be-all advice to rack management, but there are some tips I can give you from my own experience.
Use Velcro for cabling that is likely to change in the next year. Permanent or semi-permanent cabling can deal with plastic zipties, as long as they aren’t pulled too tight, but anytime you see yourself having to clip zipties to get access to a cable, use Velcro. It’s far too easy to accidentally snip an Ethernet cable in addition to the ziptie.
Your rackmount servers will, in many cases, come with cable management arms. Ignore them. Melt them down or throw them away, but all they’ve ever done for me is block heat from escaping out the back.
Label everything. That includes both ends of the wires. Do this for all wires, even power cables (or especially power cables). Write down which servers are powered by which power sources.
If you have a lot of similar servers, label the back of the servers too. Pulling the wrong wire from the wrong server is not my idea of a good time.
Keep your rack tool in a convenient, conspicuous spot. I ran a zip tie through the side of the rack, and hang mine there.
(Some photos were courtesy of Ronnie Garciavia Flickr)


